Welcome to InKing Royalty’s June Blog Hop! This year’s Blog Hop themes are inspired by a single word – and this month our projects are centered around NEW. With the launch of Stampin’ Up!’s 2019 Annual Catalog, NEW gives us the opportunity to showcase new products and play with new colors. There are also new occasions (babies, weddings, graduations) to celebrate, so you are going to see a variety of projects in this hop. We are excited to share our creations with you today! After you read my post, I hope you’ll hop over to the next person on the list at the base of this post.
Hello my sweet dumplings its been awhile hasn’t it. I know you were expecting a project from me for last month’s Blog Hop, but alas the theme just didn’t inspire me. As you know from the blurb above this month’s theme is “New” and as an Independent Stampin’ Up demonstrator the month of June is jam packed with new. There is a new Annual catalog that showcases new stamp sets and beautiful new designer series paper. Since there haven’t been any new additions or occasions in my family my new is going to be a project showcasing new Stampin’ Up products. The new that really spoke to me was the Perennial Essence Suite. I’m a fan of the work of the French painter Claude Monet and the delicate beauty of the Perennial Essence designer series paper really reminds me of his work.
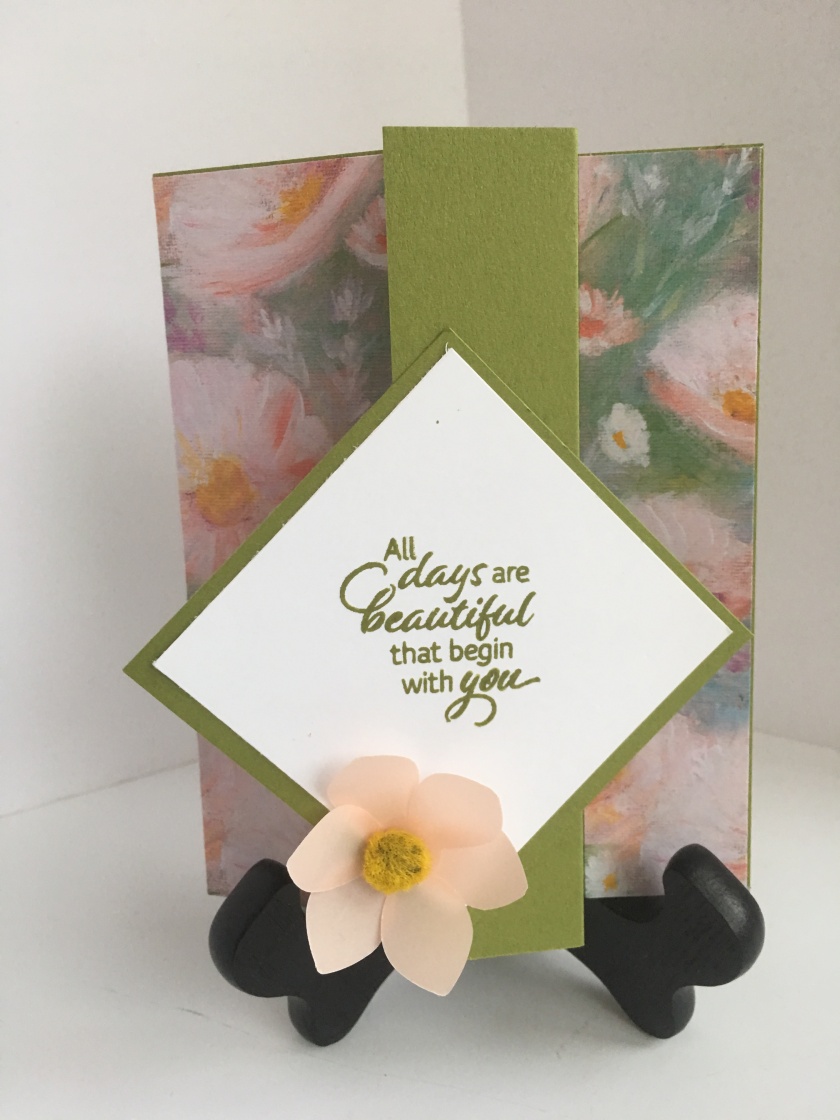
My project for this month’s Hop is a Z-Fold card. I used Old Olive cardstock for my card base. Then came the really hard part of this project . . . selecting which one of the beautiful designer series papers I was going to use. I’m hoping you’ll love it as much as I do. I’m also hoping that you love the end result a, if I can say so myself, lovely Z-fold card. The sentiment that I used came from the Floral Essence photopolymer stamp set. Now lets go thru the steps of making a Z-Fold card (you’ll be amazed at how easy it is considering the end result).
- Cut your card base: I used a piece of standard size 8-1/2 in. x 11 in. card stock that I cute in half in landscape (that the 11 inch side) so you end up with a piece of cardstock that measures 8-1/2 in. x 5-1/2 in.
- Score your card base: Score at 4-1/4 in. and score again at 1-1/4 in.
- Designer Series paper: You need 2 pieces of designer series paper. One piece should be 3 in. x 5-1/2 in., the other should be 1-1/4 in. x 5-1/2 in.
- Attach the Designer Series Paper: Flip the card base over so that the 1-1/4 in. score line is to your right. using your favorite adhesive, I used Stampin’ Up’s Multi-Purpose Liquid glue, attach the 3 in. x 5-1/2 in. piece of dsp to the left of that 1-1/4in. score line (it should cover the space between the score lines). Flip the card base over, (now that 1-1/4 in. score line should be to your left). Line the 1-1/4 in. x 5-1/2 in. piece of dsp to the edge of the card base, to the right, and adhere it using your choice of adhesive.
- Use your bone folder to make your 4-1/4in. fold line crisper, flatter (?) so that the card closes better. Then fold the edge where the 1-1/4 fold like is to the left and reinforce (that’s the word I was trying to think of) the fold line with your bone folder.
- You need two pieces of cardstock in colors that coordinate I used Old Olive and Whisper White. The Whisper White is a 2-3/4 in. x 2-3/4in. square and the Old Olive is a. 3 in. x 3 in. square. I stamped my sentiment in Old Olive on the Whisper White square and then adhered it to the Old Olive square.
- FINALLY (have you ever noticed that a card never seems to have as many steps when you’re making it as it does when you’re writing the steps out for someone else) Anywho my sugar dumpling adhere the squares to the 1-1/4 in. piece you folded back centering it between the two sides of the actual card. Do not try to center it on the 1-1/4 in. section. You’re actually going to attach it a little to the left of center. That’s it you’re done. Now if you would like to add a sentiment inside you may, just be careful of your placement.
Naturally after I completed my project it started saying ” I need more, I need more”. So what did I do? I gave it more of course. Using the Perennial Flower punch and a piece of pink vellum from the Perennial Essence Vellum cardstock I punched out two flowers, lined them up to form one blossom and adhered them using two mini glue dots. I attached that to the bottom of the Old Olive/Whisper White square that I stamped my sentiment on.
Here’s my card I am in love with the designer series paper. If you’re interested in purchasing any of the products that I used just go to my Online Store and place an order.
Thank you for stopping by today. I hope you’ll hop along to the next stop on the blog hop, Julie DiMatteo at The Paper Pixie There’s lots of inspiration to be found in this group – and you don’t want to miss it!
xoxo,
Robbye aka Miss Hammie
Thank you for hopping along with us. If you get stuck during the Blog Hop, please use this line-up as a guide:
- Brian King at Stamp with Brian
- Jennifer Spiller at Westside Paper Creations
- Denise Hoepfner at The Mountain Magpie
- Candy Ford at Stamp Candy
- Pam Morris at Tap Tap Stamp
- Robin Myren at Songbird Designs by Robin
- Jackie Beers at Blue Line Stamping
- Lynn Kolcun at Avery’s Owlery
- Robbye Hamilton at Miss Hammie’s Crafts
- Julie DiMatteo at The Paper Pixie
- Linda Krueger at The Stamp Coach
- Shawn de Oliveira at Shawn Stamps
- Sue Jackson at Just Peachy Stamping

What a fun fold and a beautiful card, Robbye! This flower is beautifully showcased. ♥
LikeLiked by 1 person
Thanks Brian
LikeLike
Robbye, this card is simply beautiful! Thank you so much for sharing!
LikeLiked by 1 person
Thanks Denise
LikeLike
This is such a sweet card. I love the fold and the DSP is a perfect match to your flower.
LikeLiked by 1 person
Thanks so much Jackie
LikeLike
Robbye, I love your Z-fold! Thanks for the instructions! You paired it perfectly with that gorgeous DSP!
LikeLiked by 1 person
Robbye, I love every piece of that DSP! I have trouble choosing too! Thanks for the Z-fold directions!
LikeLiked by 1 person
I love the green writing with the green card. Very pretty!
LikeLike